


Build an In-House Wine Bar
- Jaci Harbin

- May 20, 2022
- 8 min read
Lets face it, these days, we all could use a little me-time. And some extra storage. And wine. That said, for the record, if you're not much of a drinker, this would also make an excellent coffee/tea/beverage bar.
Note: This is what I used for my specific closet-turned-wine-bar. Your dimensions are probably going to be different so make sure you measure everything FIRST (and then measure again) so you don't make any costly mistakes.
What I used:
Wood:
3/4" plywood (countertop & base top - you could use 1" thick wood for the countertop - see our laundry room worksurface for instructions)
1x2 (countertop back trim)
1x1 (countertop front trim)
(1) 1x12x8 (shelves)
(2) 2x6x8 (base the cabinets sit on)
Other Materials:
(2) 18" unfinished wall cabinets
(2) cabinet pulls of choice
(6) shelf brackets
Clear under-shelf wine glass holders (these are similar)
Light of choice (need to see all those wine labels!)
Tools Needed:
Oscillating Saw
Mini pry bar
Hammer
Table saw OR circular saw
Miter saw
Orbital sander
Drill (with bits)
Nail gun
Countersink bit
Tape measurer
Clamps
Level (long and short)
Supplies:
Pencil
Sandpaper - 80, 220
Cabinet screws
Wood screws
1 1/2" brad nails
Wood filler
Paint rollers, paint brushes, rag for stain application
Paint (I used Behr Nocturne Blue)
Stain (I used Minwax Red Mahogany)
Polycrylic topcoat
Spray paint (I used rustoleum gold metallic finish)
Paintable caulk
Step 1. Find a spare closet.
Okay, I know this might be harder for some of you, space is at a premium and you might not have a closet to spare. Maybe you have a weird little nook or alcove you don't know what to do with - that would work too! Seriously though, we lucked out and had this weird under-stairs closet. It's split in half, the short part near the bottom of the stairs is out in the garage, perfect for storing paint, while the taller half is inside the actual house. When we first moved in, it became the catch-all closet. We have a coat closet in the foyer so we didn't really need more space for jackets or shoes. Our closet in question is in the hallway, right off the kitchen and the more I thought about it, the more it seemed like the PERFECT spot for a wine bar.

Step 2. Measure and sketch.
How big your space is will make a large impact on what you can put in it. I knew we wanted cabinets to tuck away extra glasses, bar supplies, and the less fashionable spirit bottles as well as space for wine bottles and glasses.
There were a few iterations (there should always be a few iterations when it comes to design!) but after some back and forth with Mr. Harbin and Aurelia, I decided on this.

Step 2b. Measure again.
If you're wanting to add cabinets, make sure that there's enough depth for not only the cabinets but also to be able to open the doors. Because of this stipulation, we ended up using unfinished wall cabinets which are 12" deep (as opposed to unfinished base cabinets which are 24" deep). Our closet was just over 3 feet wide so there was room for 2 18" wide cabinets which worked out perfectly. I quickly put the closet in Revit to get an idea of the spacing and make sure the wine storage would fit as well as all the glasses that I was planning on displaying. You could do this by hand if you're skilled with a scale or use painters tape on the actual walls to make sure it will look the way you want it to.

Step 3. Go shopping!
Now that you've confirmed your measurements (you did confirm them, right?) head to your local home improvement store. Get one of those carts for wood, you'll need it!
Step 4. Paint and wallpaper.
If you're planning on removing the door to your closet, now is the time. Take everything out of your closet, remove any shelves and then clean your walls (ours had plenty of scuff marks that needed to be removed), patch any holes and let it dry. Sand down any uneven areas from your drywall filler and clean off any particles. Paint your chosen color (I painted the wall that would have wallpaper too just in case I changed my mind and decided to remove the wallpaper at some point). I wallpapered the back wall the next day - contact paper is relatively easy to work with (aka if you mess it up and it's not straight, you can pull it off and fix it).


Step 5. Cut and prep the shelves and countertop.
I cut the 1x12s to 3'-4" wide for the two longer shelves and and 1'-4" wide for the shorter shelf. The plywood piece for the countertop was cut to 3'-4" wide and 1'-6" deep so there was a slight overhang over the cabinets, ensuring the wine bottles had plenty of room and were stable. I cut the 2x1 and 1x1 to the same length as the countertop - these will cover the cover any uneven edges at the back of the countertop and the unfinished edge at the front of the countertop. Sand everything and when you're done, wipe down the wood to remove the sawdust.

Step 6. Install the cabinets.
The first step to installing built-ins is to prep the space. You'll want to install them directly on the sub-floor, so that means pulling up flooring (carpet, LVT, whatever) where the cabinets will sit.

NOTE: Some people install built-ins directly on top of carpet or LVT/LVP (or whatever other flooring might be there) however, it's important to remember that if the flooring is ever replaced in the future you'll be stuck with the original flooring underneath the built-ins (you can't remove it afterwards). This can make for a height discrepancy and the new flooring may not line up correctly. Our opinion is the best practice is to simply pull up the existing flooring and work directly on top of the subfloor - your baseboards will hide the framing and allow for the expansion gap if your flooring requires it.
Measure how far out your cabinets are at the sides and mark that distance on your baseboards. Score the caulk at the top of the baseboards out to your mark and then use an oscillating saw to cut straight down the baseboard. Carefully insert a mini pry bar between the wall and baseboard and carefully loosen the baseboard from the wall (there will probably be nails so pay special attention to where it is sticking to the wall. Pay particular attention to not damaging the baseboard from the back wall - you'll reuse it in front of the cabinets. Once the baseboards are removed, pull up the flooring underneath where the cabinets will sit. If you have LVT/LVP (luxury vinyl tile/plank) you'll want to make sure you leave a ~ 1/4" expansion gap so the flooring does buckle (don't worry, the gap will be hidden by the baseboards).


Now that the space is prepped, build your base. I wanted my cabinets to be the same height as base kitchen cabinets (35"), however, because I purchased wall cabinets due to depth constraints, the cabinets themselves were only 30" tall. A base is the easiest way to make the cabinets sit up higher while ensuring the cabinets are still stable. I used 2x6 wood to create a rectangle the length of the wall and with two internal supports and then a piece of 3/4" plywood on top.


NOTE: I made rip cuts in my 2x6s (which actually measure 1 1/2"x5 1/2" because I needed the baseboards to cover the base. Without being cut, the base measures 6 1/4" (5 1/2" from the wood + 3/4" from the plywood on top) while the baseboard was only 5 3/4" tall. Removing the 3/4" from the 2x6s brings the base down to 5 3/4".
Once the base is in place, set your cabinets on top. Chances are there will be a bit of a gap on the sides between the cabinets and the walls. (You can purchase specific cabinet filler pieces or do what I did and use leftover narrow wood to fill the gap.) Once you have the cabinets set up the way you like and confirmed that there is space to open the doors, take the doors off the cabinets and set them aside (you'll need to paint/stain them later anyway). Make sure your cabinets are level and plumb (straight) using shims as necessary to account for uneven walls and wonky floors. Find and mark your studs and attach the first cabinet to the wall (hitting studs wherever possible) using long cabinet screws. Once the first cabinet is in, use clamps to attach the second cabinet to the first. Use your shims to make sure the cabinet is again, level and plumb and attach it to the wall the same as the first. Once it's attached to the wall, they need to be attached to one another. Use a countersink bit to drill holes through the side of the cabinet and attach using wood screws.


Now's the time to fill the spaces on the side - use cabinet wood filler pieces or extra pieces of wood you have laying around. Since these pieces can't be attached directly to a stud or the wall, attach a small block to the cabinet by drilling through the cabinet side and attaching with a screw. Fit the filler piece of wood into the space and attach to the wood block with nails. Fill the holes with wood filler. The whole ensemble should feel very secure once everything is assembled!


Now is a good time to dry fit your countertop piece and make sure it fits (walls are never straight and 1/8" of an inch makes a big difference).

Step 7. Paint and stain.
With the cabinets installed, doors removed, and countertop/shelves cut, now's the time to paint and stain. Since I was painting the cabinets, I started by lightly sanding so the primer adheres well - after a quick cleaning, I applied two coats of primer and two coats of paint (lightly sanding and wiping down in between coats) following the manufacturer's dry times. Since I was staining the countertop and shelves, I applied the stain with a cloth, let it sit for a few minutes before wiping off any excess, and then allowed it to dry for 24 hours. I then applied 3 coats of polycrylic topcoat with a brush, allowing it to dry for 2 hours in between coats. I really love the rich, warm color the red mahogany stain gives and the top coat imparts a glossy finish that enhances the stain.


In between painting and staining, I spray painted the shelf brackets gold.
Step 8. Install the cabinet doors, countertop & shelves.
After the paint and stain/top coat is dry, it's time to put everything together! Start by installing the cabinet pulls and then reinstall the doors.


Place the stained countertop on top of the cabinets and attach using 1 1/2" nails. Add the 2x1 piece along the back edge of the countertop to create a finished appearance, attaching using nails and the 1x1 along the front edge using glue and nails.


Reinstall the baseboard along the front of the cabinets to cover the base and the flooring gap. Use caulk on all the seams to create a seamless appearance.
Measure and mark the the height for the shelves (I started with the highest shelf), mark the bracket hole location and attach (if you can hit the studs, great, if not, use drywall anchors) and then attached the shelf to the bracket. Before installing the second long shelf, I attached the wine glass holder, ensuring the holder would not interfere with bracket location. I installed the second shelf in the same way, attaching the bracket to the wall and then the shelf to the bracket. I lined the third, shorter shelf up on the wall side with the shelf above, installing the wine glass holder before installing the shelf to the wall.


Step 9. Add the wine, pour a glass, enjoy!
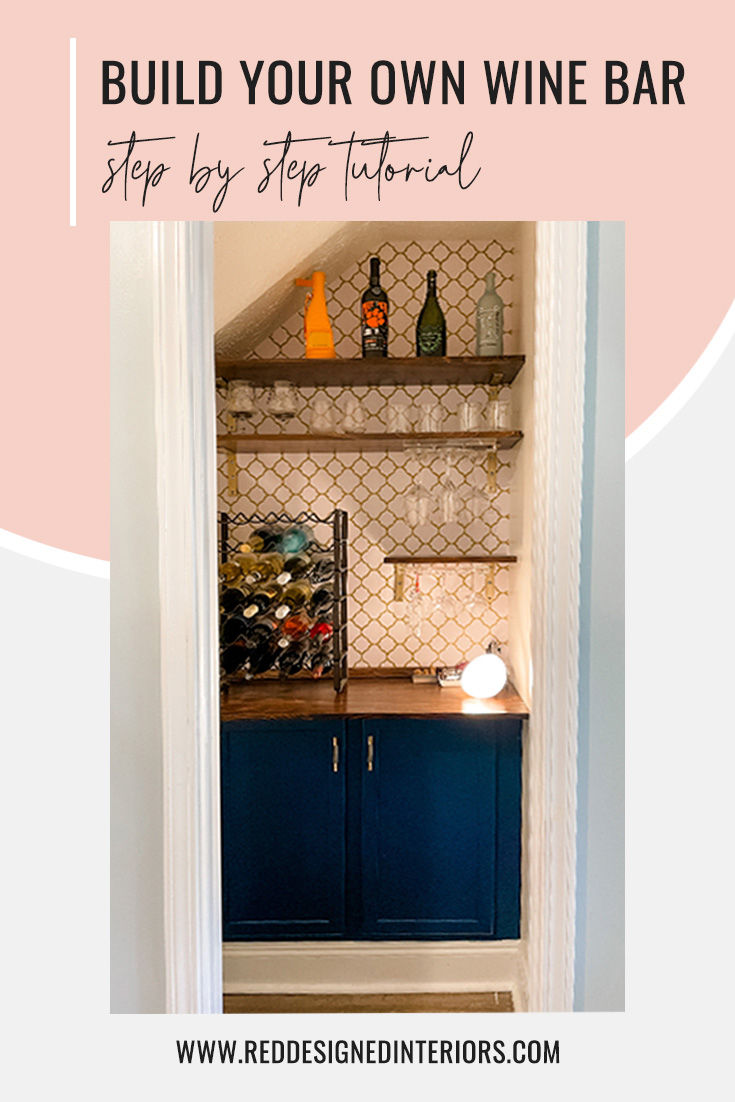
With the cabinets, shelves, and wine glass holders installed, all that's left to do is add the wine! The longer shelves at the top are perfect for special bottles that you don't want to be opened by accident while the next shelf holds shorter cocktail glasses (I love a good bourbon on the rocks while Mr. Harbin prefers white rum). The countertop has plenty of room for the wine bottle holder as well as as all our go-to accessories (openers, cork stoppers, etc) and a small rechargeable hue light. The end result - a personalized space that coordinates with our kitchen (and the rest of our home) and elevates date night and friend gatherings. We couldn't be happier.


And there you have it! From a (pretty much useless) closet to a gorgeous, functional wine bar. Hopefully this inspires you to create your own self care (yep, that's what we're calling it) space - we'd love to see your finished bar! Tag us @reddesignedinteriors and #reddesignedfurniture #reddesignedtutorials. Happy updating!
Don't have time right now? Save this pin for later!


Comments