


Easy Sew Outdoor Cushions & Mattress Cover for Daybed - Outdoor Design Series, Pt 3
- Jaci Harbin

- Jun 26, 2022
- 5 min read
Welcome back to our Outdoor Design Series! In Part 3 I showed you how I transformed an old twin bed frame into a luxurious daybed; this follow-on post (let's call it Part 3.5?) will show you how to sew the mattress cover and oversized back cushions that really set it apart. Wait wait, don't let the "sewing" part scare you off, it's SO simple, I promise. And making the cover and cushions yourself will save you hundreds and hundreds of dollars, making it well worth the effort.

First and foremost, let's talk about fabric selection. You need to be choosy when it comes to your selection; look for olefin, solution-dyed acrylic, or outdoor suitable polyester. Double check that the fabric is water-resistant or waterproof, fade resistant (colorfastness...although EVERY fabric will eventually fade if left outdoors in bright sunlight), mildew and mold resistance is also important. Fabric selection is the most important aspect when it comes to outdoor cushions - choosing the wrong fabric means your cushions/covers/pillows will fail before a single season is over and you'll be back to square one.
Dark colors (blue, black) and bright colors (including orange haha), tend to fade the fastest, so just keep that in mind. If you're worried about the colorfastness, opt for lighter colors (white, cream, beige), cover your cushions from the days most intense sunlight, and consider a preventative protectant each season like Scotchguard.
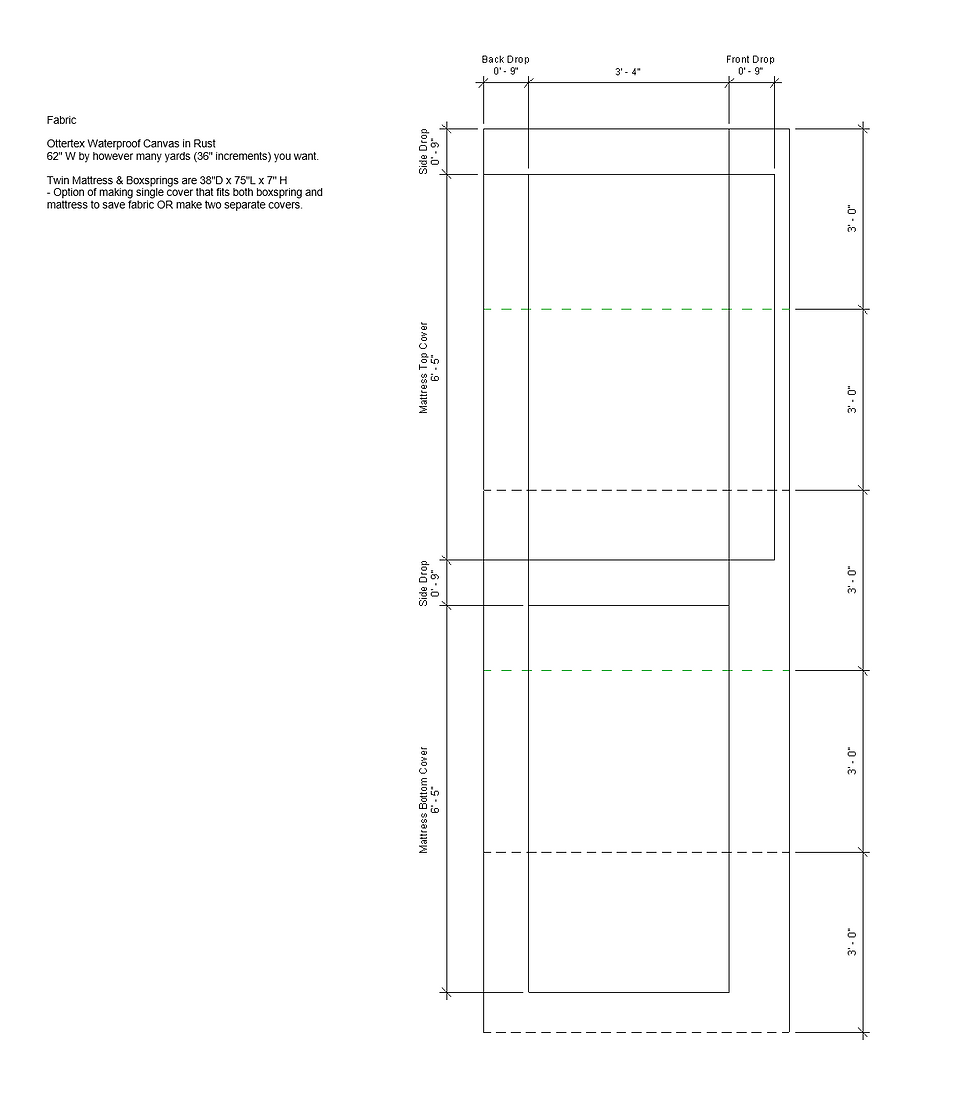
The size of your cushions/covers will dictate how much fabric you'll need. I needed 10 yards to make a single cover that went around a twin boxspring AND mattress, three 30x30 back cushions, and two 20x30 side cushions. I used Ottertex Waterproof Canvas in Rust that I ordered from Fabric Wholesale Direct for just over $8 a yard (I also ordered 3 yards of the gold for throw pillows and a pouf).
Below is the diagram I made to determine how to make the mattress cover. I was originally considering making two separate covers but that would have required additional yards of fabric for no real added benefit. The Ottertex fabric is approximately 62" wide and solid by the yard (3' or 36") so taking the length, width, and height of the mattress and boxspring into account showed me almost 5 yards of fabric (using almost the entire 62" width) to create the cover. The other 5 yards would be used to create the 5 cushions.
Once I had my fabric, I rolled everything out and transferred the marks onto the WRONG SIDE of the fabric using a sharpie. I was paranoid about cutting such a large piece of fabric and messing it up so I re-measured and double checked everything several times just to make sure I had it correctly marked. The moment of truth was nerve-wracking but anticlimactic - it didn't even look much different.


If you can operate a sewing machine you can sew the seams together. Even if you haven't used a sewing machine before, I promise it's not hard, and it's very easy to pick up; YouTube knows EVERYTHING. I don't have my own sewing machine anymore, so I borrowed my neighbor's machine (thanks Cassie!) and got to work. I ordered thread on Amazon that came with matching pre-wound bobbins and chose the color closest to my fabric.
I decided to install a zipper that would go around one of the short edges in order to get the mattress and boxspring in, so I sewed that in first. I made sure my zipper went AROUND the corners a few inches so it would be easy to secure the mattress and boxspring in when the time came. I ordered zippers by the yard off of Amazon (they're WAY less expensive) - if you go this route, just know you have to add the zipper pull onto the zipper fabric and sew a stop so the pull doesn't come off when you use it. With the zipper together, I pinned one side, and carefully sewed it in. Once the first side was complete, I unzipped the zipper, pinned the other side and sewed that side in. If you aren't familiar with sewing zippers, it's not difficult but it's easier if you watch someone do it first. When I'm unsure, I turn to YouTube for guidance...this video from Niler Taylor might be from 2012, but it's short, sweet, and clearly explains the process.


Once my zipper was sewn in, I tested it to make sure everything lined up correctly, then left it unzipped so I could turn the cover right-side out when I was done. All that was left was to sew the matching seams together and then turn the cover right-side out. It essentially looked like a deflated box...which is what it was until the mattress and boxspring were put inside.


There was a moment of panic when I thought the boxspring wasn't going to fit, but it was just slightly off-center and once corrected, slid in no problem. The mattress fit just fine on top, in fact it the cover probably could have been slightly smaller so it fit more tightly, but then it would have been difficult to get boxspring in so I probably wouldn't change the dimensions.

Now that the boxspring and mattress was one piece and in place, it was time to make the back and side cushions. I knew I wanted the cushions to be oversized (the back and side rails aren't comfortable to lean against) so I decided on 30x30 back cushions and 20x30 side cushions to balance it out.
The cushions are so easy to make. For the 30x30 cushions, I cut two pieces of fabric, 30" wide by 30" high, pinned the right sides together (so the wrong sides are facing out) and then sewed 3 of the 4 seams.

For the last side, I sewed approximately 2/3rds of the seam, turned the whole thing right side out, stuffed it with poly-fil, and then hand-sewed the last bit. If you plan on making several oversized cushions like I did, yourself a favor and buy the BIG 20lb bag of poly-fil. When you're stuffing the cushions, it takes more poly-fil than you think, understuff them and the cushions will deflate when you lay up against them and no one wants sad pillows.


Once your cushions are completely sewn, the only thing left to do is test them out!


Want an oasis of your own? Check out how I turned an old twin bed frame into an incredible outdoor daybed and make your own! I'd love to see it! Tag @reddesignedinteriors and #reddesignedtutorials and make our day! Happy sewing!
Want to sew your own cushions but don't have time right now? Save this pin for later!


Comments