


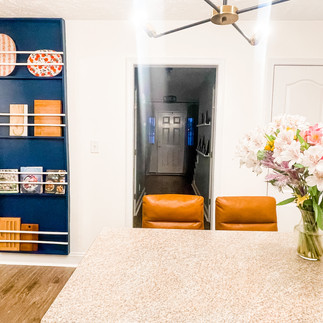
Build Your Own Kitchen Shelves for Less than $50
- Jaci Harbin

- Mar 1, 2022
- 3 min read

Nope, that's not a typo, even with the price of lumber these days. You only need a few pieces of wood to turn an unused kitchen wall into a stylish, practical plate rack to showcase all your favorite cookbooks, cutting boards, and serving dishes. Ready to make your own? Let's go!
Sketch!
All good design ideas start with a sketch, including this one. First and foremost, find a good location - does your kitchen have a wall that isn't pulling its weight? How wide do want them to be? How many shelves? How many rails and what shape?
If you have an iPad and pencil, we LOVE the sketching app Procreate - you can import a photo and draw over it which makes visualizing your space so much easier. That said, it's hard to beat an old-fashioned pencil and paper for getting ideas out of your head.


Measure
Once you've figured out where you want your shelves, measure EVERYTHING. Height, width, depth...make sure everything will fit. We like to use painter's tape and mark the outline on the wall to see it in real size. Use a stud finder and mark your studs - the last thing you want is for your plates to come crashing down in the middle of Thanksgiving because they weren't secure.

Make a List & Go Shopping
Wood:
(5) 1 x 3 x 8
(1) 1 x 2 x8 (we used a furring strip we had leftover from our Living Room Accent Wall)
Tools Needed:
Table saw
Miter saw
Kreg jig
Orbital sander
Drill (with bits)
Nail gun
Tape measurer
Clamps
Speed square
Stud finder
Level (long and short)
Ladder
Materials:
Painters tape
Pencil
Sandpaper - 80, 120, 220
Pocket hole screws (2 1/2" & 1 1/2")
Paint Rollers/brushes
Paint (we used Behr Nocturne Blue & Behr White Veil) or Stain/Topcoat
5/8" brad nails
Wood filler
Caulk
Cut and Install Vertical Supports
If you're painting the wall to match the shelves like we did, paint it before installing the shelves. It doesn't have to be perfect but it's easier to maneuver a roller (with a pole!) before you put any of the wood up.
Cut two 1 x 3 x 8 to the correct height to make the vertical pieces. Our ceilings are 8' tall but our shelves sit on top of the baseboards so our overall height needed to be 7'-6". We used pocket holes to assemble the shelves so there aren't any exposed screws - the Kreg jig makes it simple! We drilled holes in our side supports at the top and bottom as well as where each shelf will sit.
Paint the wood (we did two coats) and once dry, install with 2 1/2" pocket screws into studs, using a long level to make sure the wood is straight.


Cut and Install the Shelves
Measure the width from the inside of the left support to the inside of the right support. The width should be the same from the top to the bottom but double check just in case before you cut.
Use the last two 1 x 3 x 8 boards to cut the five horizontal shelves. Drill two pocket holes on each side on the under side of each shelf and then paint/stain as desired.
Install the top and bottom pieces to the vertical supports using 1 1/2" pocket screws using clamps to help keep the shelf in place and a level to make sure it's, well, level. Install the rest of the shelves in the same way.

Fill Pocket Holes, Caulk, Touch-up Paint
Use wood filler or pocket hole plugs to cover your pocket holes and caulk all your seams. Once dry, sand the wood filler and touch up the paint.

Cut & Install Rails
Take the 1 x 2 x 8 (which actually measures 3/4 x 1 1/2 x 8) and rip it (meaning cut it lengthwise) into (3) 1/2" strips.
Measure from the outside of the left support to the outside of the right support. Use this measurement to cut the 1/2" strips to the correct length. Paint/stain the wood.
Mark the location for your rails - ours are 4" from the shelf and each other. Make sure the rail is flush along the outside of the left and right support pieces, use clamps to keep the rails in place, and a level to make sure everything is straight. Fasten using wood glue and 5/8" finish nails. Patch the holes with wood filler and once dry, sand, and touch up the paint.


Style and Enjoy!
Add your cookbooks, serving platters, and cutting boards. Inject some of your personality into your kitchen and show off your new shelves. We'd love to see your finished shelves! Tag us @reddesignedinteriors and #reddesignedfurniture #reddesignedtutorials Happy designing and fabricating!


Don't have time right now? Save this pin for later!


Comments