Turn a Twin Bed Frame into a Luxurious Outdoor Daybed - Outdoor Design Series, Pt 3
- Jaci Harbin

- Jun 21, 2022
- 4 min read
Welcome to Part 3 of our Outdoor Design Series!
With warm weather finally here, an outdoor oasis is exactly what the doctor ordered.

When one of Mr. Harbin's co-workers asked if we had any use for a twin bed frame, I immediately said "we'll take it!". Not because we needed a twin bed frame, but because I had an idea floating around in my head that I could make an outdoor daybed and a twin bed frame would be the perfect place to start.

No lie, while I did sketch out some ideas, the disassembled frame and box spring sat in the garage for months. It was the tail end of winter and sitting out on our deck wasn't high on my list (especially with dozens of other projects that needed to be addressed - hello, laundry room, wine bar, and office desk). At some point it warmed up enough that the deck seemed appealing again and I knew Mr. Harbin would be looking forward to spending warm Spring and Summer weekends and evenings out there. I revisited the original sketch, revised it and eventually figured out the direction I wanted to take.
Now came the time to take the frame apart, which turned out to be the most difficult part of the whole thing. A hammer, chisel, and oscillating saw later, the original frame was in pieces, ready to be transformed into something amazing. I loved the tall, curved vertical pieces, so I decided to use those as well as the long side rails and bottom slats. The other pieces I didn't use didn't go to waste though - the large side panels later became a deck shelf/serving area.
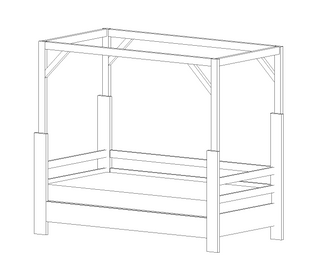
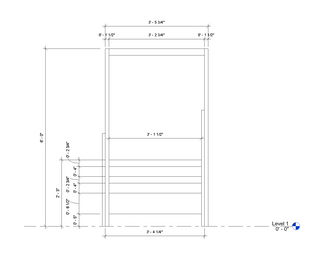
The next step was to figure out how much additional wood I needed. At Red Designed Interiors we use a combination of Revit and hand sketching to bring our design concepts to life, so that's exactly what I did here. Inputting the dimensions of the existing frame, I created a canopy and fleshed out the new frame.
I used (6) 2x6x8s to create the side and back supports as well as the upper balcony piece and (1) 2x10x8 to create the bottom box spring and mattress boundaries. Once I had all my pieces cut it was time to sand. The raw lumber was simple compared to sanding off the existing finish from the frame pieces but the process was gratifying and all worth it in the end.
I assembled the canopy first, pre-drilling pocket holes with my Kreg jig, and attaching with pocket screws, using 90 degree corner clamps to keep everything square.
Then it was time to paint! Two coats of primer and two coats of dark gray paint and then it was time to assemble the rest of the frame.
I knew the finished piece would be heavy and awkward, making it difficult to move up the deck stairs, so I opted to move the canopy and other pieces to the deck and assemble the daybed in place.
I started by assembling the lower portion of the frame. The long side rails were attached to the curved posts with the cross slats underneath, then I added the additional supports on the short sides so the box spring wouldn't slide off. The canopy was positioned evenly around the lower frame and then the back and side supports were attached. The back supports were attached to the vertical canopy pieces while side supports were attached to the vertical canopy piece on the front side and the lower frame on the back side.
Since this is an outdoor piece of furniture, the boxspring and mattress need to be protected from the elements. The final piece would have outdoor fabric covers and cushions but the fabric hadn't been delivered yet and an extra layer of protection is never a bad idea. I went with these waterproof covers from Amazon - it absolutely poured a few days after the daybed structure was complete (before the cushions were finished) and while the water pooled on the white covers, the mattress and box spring themselves were both completely dry.
Aside from the cover and cushions, there was one more step to bringing my vision to life - the outdoor drapes! The Great Gatsby moment I kept seeing in my head was so close to coming to life!

Not only do the drapes create the aesthetic I was after, they provided a level of privacy as well. I screwed outdoor hooks with a safety buckle at regular intervals into the horizontal canopy pieces, and then hung tab top sheer outdoor drapes from those hooks on all four sides. I used 108" long drapes on the front and top and 84" long drapes on both sides and the back.
Wrapping the drapes around the back and side supports or tying a loose knot in them kept them from flying around in the wind without completely losing the ethereal effect.

The daybed with drapes up and white mattress covers was quite nice, but the pop of color really makes a huge difference. Check out this post to see how we created the custom mattress cover and cushions!


The final result is this stunning daybed that beckons you to come snuggle up and stay a while. All the deck needs now is a few tables, a bench, and, of course, some plants! Hope I've inspired you to transform an old piece of furniture into something truly special - if you do I'd love to see it! Tag us @reddesignedinteriors and #reddesignedfurniture #reddesignedtutorials Happy building!
Don't have time right now? Save this pin for later!


Comments