
Vanity Refresh
- AureliaVining

- Apr 17, 2022
- 4 min read
How stripping a builder-grade vanity can completely change the atmosphere of your bathroom.

Bathroom Vanities can make or break your bathroom vibe. Our home is a run-of-the-mill builder grade style home: cheap finishes, light fixtures, and it's all the same color - beige. Now I like beige, it’s a solid base selection, however our master bathroom was ALL beige, beige tile, walls, everything - just lacking personality. I decided that the vanity in our master bathroom had to be fixed!
I wanted to keep the wood appearance of the vanity, but I hated the color. It’s a cheap vanity, so I read a couple articles, and found out that I could use gel stain on laminate wood cabinets. All my findings said that you have to take the glossy finish off, which I did, well I thought I did, and it didn’t work.
My results:

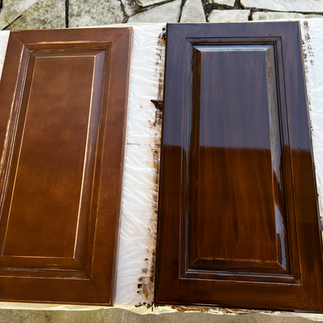


Ughhh…but, if at first you don’t succeed, try, try again. Right? Right.
I figured my first attempt failed because I didn’t bring the cabinets back to their original state, so stripping the cabinets seemed like the next logical step.
Here's a list of items I used to complete this bathroom vanity makeover:
Materials/Supplies-
Rubber Gloves (thick ones)
Glass Jar (wide mouth)
Plastic drop cloth (roll)
Cheap paint brushes
Rags
Safety glasses
Sandpaper 120, 220, 320 grit
Paper towels
Garbage bag
Stripper cleaner
Orange stripper
Newspaper
Painters tape
Polyurethane
Pre-Stain & stain of your choice
Hardware - cabinet pulls
Tools:
Screw driver
Putty knife
Detail brush pack- I found these in the auto section of Wal-Mart. Helpful when dealing with the corners (Image)
Cabinet hardware placement stencil/guide (optional, but recommended)
Drill & drill bits
To start, remove all the doors from the vanity making sure you annotate which door goes where. Take all the hardware off and keep track of all your pieces and screws. They’ll come in handy when you reassemble ;-) I might have totally lost a couple screws and had to find substitutes. It’s easier to just place them all in a good spot and make note of what goes where.
Now you're ready!!
My Process: Stripping
Pick a well ventilated area and start by covering your work surface with the plastic drop cloth. I like the roll so I can just cut what I need off. I made my cover big enough to completely wrap my cabinet door once the stripper was applied. Pour the stripper into the glass jar, using a cheap brush while wearing gloves, liberally put a layer of stripper on the cabinets front and back.
Wrapped the plastic around the door, and let it set. The instructions say you can let it set for up to 24 hours. I started late, so this worked out great for me. I found that anything over a couple hours worked well and required less effort to remove the finish. You can start removing the finish by simply wiping it off with a paper towel, but make sure you have gloves on and you throw the paper towels in the garbage bag (follow all disposal instruction on label). Use a putty knife and detail auto brush to scrape whatever doesn't come off with with your paper towels.


Once you’ve removed all you can without scraping your cabinets, wipe the doors off and clean with the stripper cleaner.
When they’re dry, take your sander or sandpaper, starting with 220 grit, if it's taking more than a few seconds to clean off the door leftover finish, change the grit to 120 sandpaper, and go up to 320 grit fro-m there.


Wipe off the saw dust and set aside. Finish all the pieces and then move on to the vanity base. I didn’t remove mine. I picked a time when there’s limited use of the bathroom and applied the stripper. I let the stripper work for about three hours before attempting to remove the finish.

My process was the same for the base as it was for the doors. Tape off the floor and walls, and lay newspaper on the floor to help protect it; it was easy to wipe off the finish from the vanity. Clean it with the stripper cleaner, then do a light sand starting with 220 grit and working up to 320 grit, if needed use the 120 grit. Wipe it clean when done.
I went over all my pieces with a soft brush vacuum attachment just to be extra sure the grit was off.
My process: Staining and Polyurethane Selections
I used Minwax Wood Effect - Weathered Gray (I might be slightly obsessed with this stuff) and a semi-gloss polyurethane from Minwax as well. The wood effect is applied first, then just wait the directed time to dry before applying the first coat of polyurethane. I put three coats of poly on the vanity, letting each coat dry according to the instructions on the label, and lightly sanded in between coats using a sander block, 220 grit.

My Process: Hardware Placement
Now comes the fun part. Put all your doors back on using your screwdriver or a screwdriver drill bit. Ensure your doors go back in the spot you took them from. Step back and make sure your doors are all level and aligned with each other before installing hardware. If you don’t then your hardware might be crooked after installation, so do yourself a favor and just take a moment to ensure all is good.

When it's all straight, get your hardware and hardware template.

I just selected a hole that hit my desired location, marked it, and drilled a hole. Use a drill bit that is the same width as your hardware screw to allow the screw to pass through the wood fairly easily and then attach your hardware. That's it, you're done!


Have fun transforming your bathroom and enjoy styling your new space! Take a picture of your results - we would love to see it! Tag us on Instagram @reddesignedinteriors and #reddesignedfurniture #reddesignedtutorials and on Facebook at https://www.facebook.com/reddesignedinteriors. Happy designing and fabricating!

Don't have time right now? Save this pin for later!


Comments