


Design & Build a Floating Nightstand
- AureliaVining

- Apr 5, 2022
- 5 min read

I’ve always liked the look of floating nightstands. They have a clean and simple no-fuss design that I love.
Since the purchase of our new home the master suite has been our main focus. We’ve redone the closet and made some changes to the bathroom. Now that we are focusing on the bedroom, floating night stands were top on my list.
To get things moving, I compiled a list of what I wanted from our nightstands, making sure their functionality catered to our needs. Here’s what drove my design:
Charger access
Modern look
Natural wood to add warmth and character to the space.
My hubby has a CPAP machine, so I wanted the nightstand big enough to hide that mess while still being accessible at night.
Using these notes I was able draw out how the nightstand would look, created the plans and made a cut sheet. My overall dimensions for the nightstand are: 15” L x 15 1/2” W x 19 1/2” H. I had everything I needed to purchase my materials and get started.
Here's my process...
Step One: Measure, cut, band, and sand
I used 1/2" thick plywood to keep the stand lighter in weight. I Laid out my wood, did all the measurements, and cut all the pieces at one time. After all cuts were done, I made note of what edges needed to be banded, and only banded the edges that would show once the stand was assembled. I Used 1/2" iron-on wood banding to finish the edges.


Then I sanded each side starting with 220 grit sandpaper until smooth, making a final pass with 320 grit.


Step Two: Stain & Poly coats
I used Minwax Wood Effects - Weathered Gray, and love how it brought out the grain of the wood. If you choose to do the same, be careful not to oversaturate the pieces, this stuff is pretty watery. I had to lay cloth under my pieces while applying the effect so it didn’t run to the back. This happened to a couple pieces when I was building my first stand, creating blotches I wasn’t able to sand out. Luckily, I made my husband’s first and the blotches are on the inside of the box, and will never be seen. Hehe! He'll never know!
I applied two coats of the effect (letting it dry fully as directed on label), and then applied a pre-stain, followed by three coats of a semi- gloss Polyurethane.
The wood effect and the pre-stain got the wood to the color I wanted, so I just added the poly - sanding between coats. I used 220 grit sandpaper after the first coat, and then 320 grit after the 2nd and 3rd coat.


Step Three: Pocket holes and wood biscuits
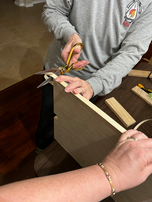
Next, I drilled my pocket holes and cut the wood biscuits joints (biscuits are flat, oval, wooden dowels. Biscuits!). I started by laying all my pieces out, making sure connecting pieces were side by side when possible. See image below

This allowed me to get the same placement for the biscuits on both edges that would connect when assembled. I also annotate where I wanted my pocket holes.
I placed my biscuits about 2" (on center) away from the ends, and 5" inches apart - center to center. The pocket holes were spaced about 3”- 3 ½” apart from each other.


Step Four: Assemble
I’d recommend using 90 degree corner clamps to help hold your corners together while you join them with the pocket screws.

I used 1” pocket hole screws (box of 100) and almost used the entire box! It's a sturdy box. The wood biscuits that I had on hand were size 20, which is fine, but I had to switch the cutting depth on my jig when cutting into the top of a piece vs the edge of a piece.
I learned from the first nightstand to put the drawer railings in while the top of the box was off, which made attaching and measuring the rail placement easier. I’d highly recommend doing the same.
Finally, I connected the top two pieces together with pocket holes and a wood biscuits, and then attached those two to the base with pocket hole screws on the back.


Step Five: Build Drawer
I waited to build my drawer box till the frame was built to make sure my dimensions were right. I measured, cut, sanded, primed and painted, each drawer. Then I assembled the drawer using pocket hole screws and my 90 degree corner clamps.


Step Six: Drawer Front and Pull
This step was the most difficult for me. It took me a lot longer than expected to make sure that the front was straight. I started by setting my box on its back, and laid my drawer front in its place. My drawer front was flush on the sides with about a 1/8" gap on the top and bottom. Mark where the pull connects the front, using a level and tape measure to ensure it's straight. Then I removed the front and made holes where I had marked with a drill.


Next, I sat my nightstand up right and placed the front back in its place. Using playing cards to adjust the gap on the top and bottom. I marked where the pull holes sat on the drawer, pulled the front off and drilled holes into the drawer. Finally I was able to place the front on and attach the pull using the pre-drilled holes and the pull hardware. This is where drawer clamps come in handy. I didn’t have any, but found these Rockler Drawer Front Installation Clamps on Amazon that my partner said worked great.

Step Seven: Hanging Hardware
I opted to use French cleats, just because I wanted the option to remove the nightstands easily. I selected 6" cleats that I found on Amazon and placed four on each nightstand - two on the top portion and two on the bottom portion. If you're making one of these nightstands, place the cleats on the bottom as high as you can without running into your pocket screws. This helps the cleat hold the weight of the box better. I initially had the top and bottom ones in the middle of each section and it buckled a bit where the top and bottom piece connect.
Also, because the hardware is about ¼ inch thick (something I didn't account for when making these stands) I added two pieces of ¼ inch thick wood to the back of the bottom portion. This allows the nightstand to lay flush against the wall and secures the box better.


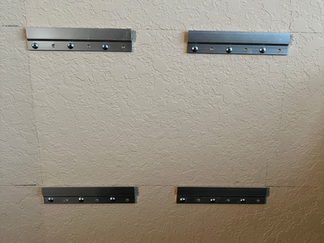

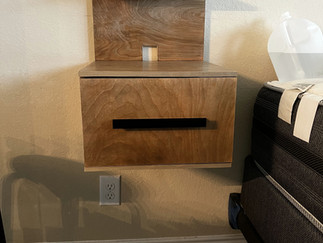
Place the opposite cleat on the wall, mark, drill, and screw into the wall, using drywall anchors if there's no stud. If you’ve never used French cleats before look on YouTube for instructions on how to properly mount French Cleats on the wall. The link provided is the one I found most helpful. Mount your nightstand and look at what you made!
Step Eight: Pat yourself on the back and enjoy!
You've officially made a piece of furniture, by hand, from scratch! Step back and admire your work! I find it very satisfying to take a minute and revel in the fact that I created something with my own hands.
Like what you see and want to make your own floating nightstands? We don't mind if you copy us! Have fun and when you're done we’d love it if you share the finished product with us on Instagram @reddesignedinteriors and #reddesignedtutorials and on Facebook at https://www.facebook.com/reddesignedinteriors
Until next time friends, happy creating!
Aurelia Vining
Red Designed Interiors
Be sure to check this out!
Still not quite sure where to start and need more guidance? Click on the link below to see our detailed shop drawing to include a materials list, tools required, cut sheet, and step-by-step instructions with photos and diagrams to take all the guesswork out of this project.


Comments