


Guest Bedroom Series, Pt 2: DIY Upholstered Headboard Wall with Picture Ledge
- Jaci Harbin

- Nov 2, 2022
- 5 min read
Updated: Nov 8, 2022
Welcome to Part Two of our Guest Bedroom Series! Today I'll be showing you how to create your own upholstered channel headboard that requires ZERO holes in your wall.
Our guest bedroom had become a point of annoyance for me - I designed the space months ago and have been meaning to get started...but...it's a GUEST BEDROOM. We don't have guests that often. And I had 700 other things on my project to-do list. So it just wasn't been high on my priority list. That said, our best friends are coming in November all the way from Hawaii and while they are definitely family and not guests, they will be staying in our guest bedroom. That room went from "that's a later problem" to "huh, I guess it's a now problem". That said, as much as I love the look of an upholstered headboard, they are expensive and it's a guest bedroom (have I mentioned that yet?). Besides, the room is relatively small, about 10' wide, and a traditional headboard, upholstered or otherwise, would highlight that. What to do? Creativity and value engineering is key, y'all.
NOTE: There are multiple different ways to create this headboard wall. Read through the materials and instructions - use this post as a starting point and go from there!

Tools Needed:
Table saw (or circular saw with straight edge)
Drill with bits
Staple gun
Materials Used:
1x6x10 (I used leftover fence pickets that I had from building Rio's puppy firepit spot because I was being cheap haha)
(3) 1x2x8 furring strips
3/4" screws
1" screws
(18) 2.5" diameter pool noodles (or 18 half round upholstery foam pieces)
Staples
Batting
Fabric of choice
Step 1: Finalize Design, Go Shopping
First things first, you need to figure out what color do you want your headboard wall to be and then determine what fabric to use. I sketched my guest bedroom out and knew I wanted the headboard to be gold like the drapes. I was concerned that the drapery and headboard fabrics wouldn't be similar enough if I purchased them separately, but I also didn't want to use expensive velvet drapery fabric for a headboard that would be at least half covered. Ikea came to my rescue. They had sumptuous velvet drapes in a rich goldenrod color but also a lighter fabric (which, perhaps more importantly, was less expensive) in the same hue. Since the drapes were sold as sets of two panels at 96" tall, I bought one set of the velvet drapes for the windows and two sets of the lighter drapes for the headboard wall.
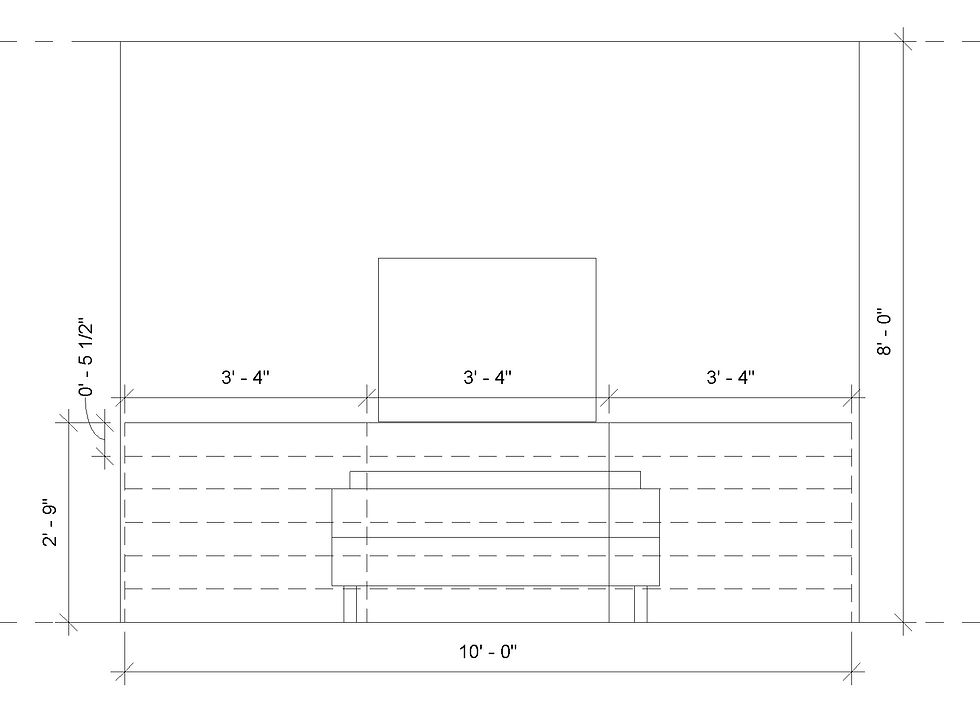
You also need to figure out just how much fabric (and other materials) you'll need to complete your headboard. Measure the entire width of the wall and then determine how tall you want the headboard to be (take into account how high the mattress sits on the bedframe and how tall your nightstands are.
Consider how you're going to get the headboard wall in the space...this guest bedroom is at the end of a hallway on the second floor. Getting a rigid 10'+ long, almost 3' tall panel up the stairs and around the corners would have been nearly impossible, plus my fabric was only 8' long, so I decided to make 3 vertical sections and attach them together when they were finished to make one long finished piece. If your room is easily accessible and you're using upholstery fabric sold by the bolt, you could just do one long piece - it's up to you!
I drew everything out in Revit, found all my measurements, got all my materials and then got to fabricating.
Step 2: Cut Materials
Using the measurements from my drawing, I cut my 4x8 panel into (18) 3'-4" long rectangles.


I cut the pool noodles to same length as the panels and then cut straight down, completely through on one side and then partially through below that so the noodles could be split and would lay flat on one side. Repeat for all the pool noodles.


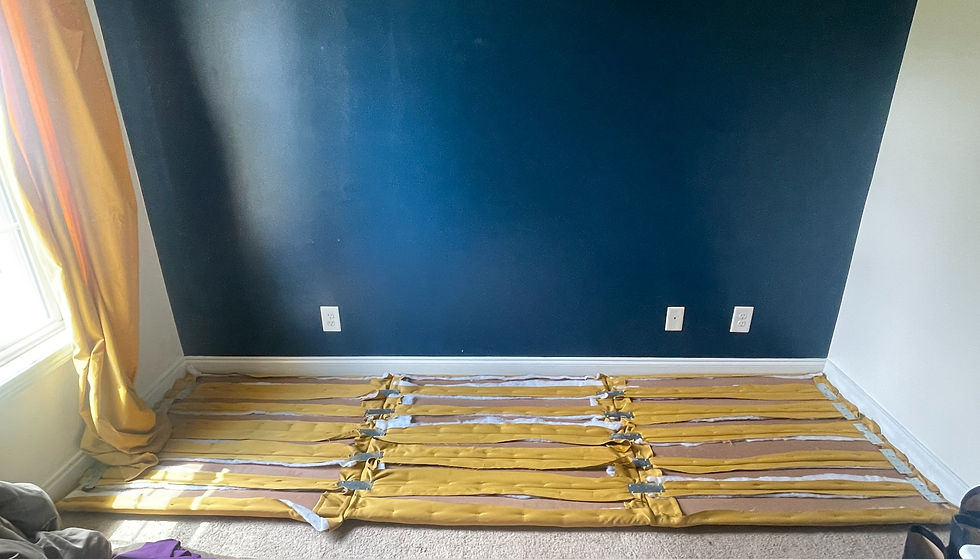
Lay the fabric right side down and then lay out the panels leaving enough space between them to account for the foam and batting. Cut the fabric out. Using the fabric as a template, cut an equal number of batting pieces.

Step 3: Cover Panels with Fabric
Now to assemble the pieces. Place a piece of fabric right-side down on a stable, flat surface, then place a piece of batting on top of the fabric. Add the pool noodle (or upholstery foam) curved side down, then place a wooden panel piece on top. I started with the sides first, pulling the fabric and batting up and over the pool noodle and stapled taught one side and then the other. Do one long edge at a time so the fabric doesn't pucker paying close attention to tucking the corners neatly.


Repeat for the rest of the panels.
Step 4: Attach Panels
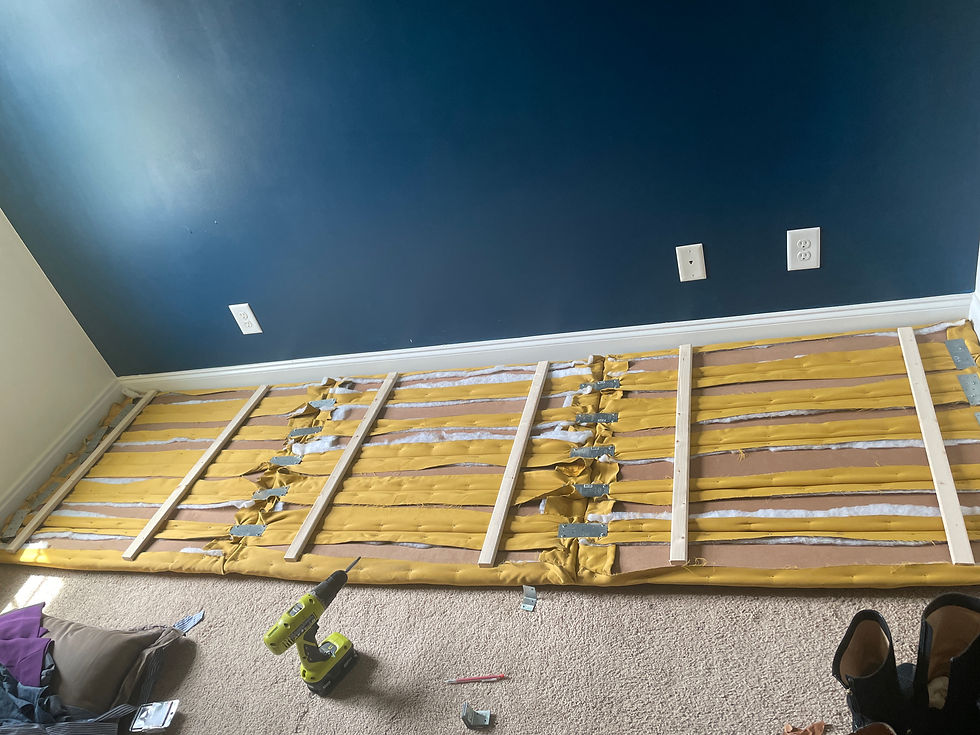
Working with one vertical section at a time, lay the panels on the floor or other very large worksurface so that edges touch. Connect the pieces to one another with tie straps. If you can find (or order ahead of time) longer tie straps, those will create more stability in the final piece. That said, the longer versions were out of stock at my local Home Depot and I was impatient. I could have (probably should have) ordered the full length tie straps but the 5" version was in stock and cost less than a $1 a piece so that's what I went with.
I used #8 screws that would fit through the tie straps at 3/4" - long enough to attach the tie strap securely to the panel but short enough to prevent poking through the foam.
Attach the vertical sections to one another using additional tie straps. If you try to stand the whole piece up now you'll notice it's wobbly and will collapse under it's own weight despite being quite light. Adding the 1x2 furring strips will give the entire headboard the rigidity it needs to stand straight.
Cut the furring strips to a length that is slightly less than the total height of the headboard and attach at the outer 1/3 of each vertical section using 1 1/4" screws after predrilling the holes so you don't split the wood.
Last but not least, add the picture ledge at the top. I used 1x6 fence pickets that I had leftover from another project. Since my wall is slightly over 10' wide, I used two pickets, cut the pieces to the appropriate length and then attached them together with staples. You can use whatever method you want but this was quick and easy and won't be bearing much weight. Cover the fence picket with batting and fabric, using staples to secure. Attach the picture ledge to the rest of the headboard using right angle tie plates.


Step 5: Style!
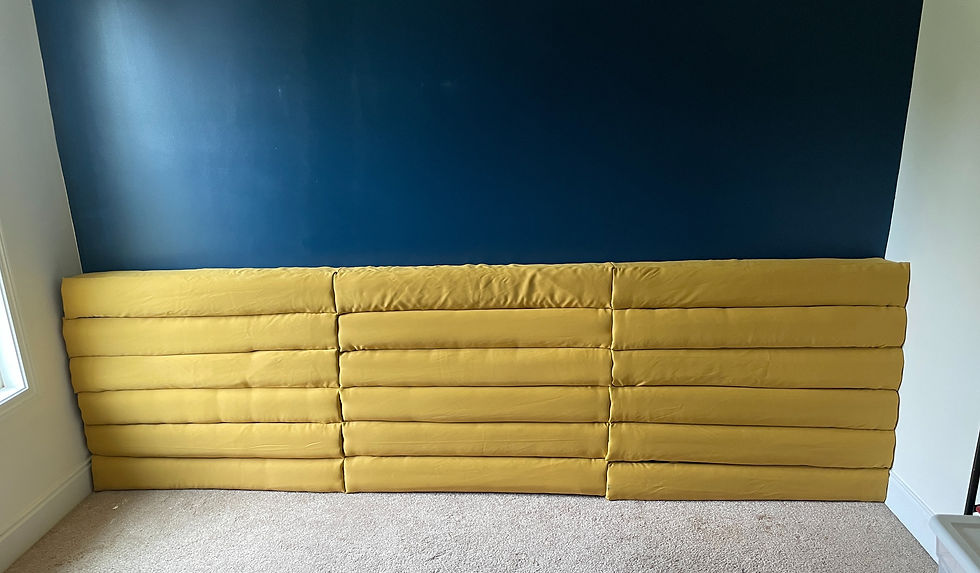
The hard part is done! Stand your new headboard up against the wall, ensuring all the pieces are straight and lined up. That's it. The picture ledge leans directly against the wall and since the headboard is the exact width of the wall itself, it fits snugly into the space. No anchor points, no extra holes in the wall. You don't even have to worry about hanging your art. The absolute best part? You can run cords for chargers, lights and whatever else you might need through the panels to tuck them out of sight. It's like magic.
Add your bed frame, mattress, nightstands, lights, art and there you have it! A well defined visual focal point for your freshly designed bedroom that is sure to leave your guests speechless.
Be sure to check out the full reveal here and see how the painting came to life.
If you make your own headboard we'd love to see it! Tag us on Instagram @reddesignedinteriors and #reddesignedtutorials.
Love the idea but don't have time right now? Save this pin for later!


Comments