


Modern Porch Chairs from Scratch - Outdoor Design Series, Pt 7
- Jaci Harbin

- Jul 19, 2022
- 5 min read
Can you believe that it's halfway through July and Summer is officially in full swing? From the deck reveal, to the daybed and its cushions, the planter and herringbone top tables, and just last week, the Adirondack chairs and puppy bed at the firepit, it's been a pleasure sharing our walkthroughs with you. We hope you've enjoyed this Outdoor Design Series and found plenty of inspiration to get your outdoor spaces in tiptop shape!

For our final project of the series, I'll show you how to create modern outdoor chairs with cushions that are perfect for a front porch or deck. Similar versions of these chairs are quite popular around the web and I checked out several different versions for inspiration but I liked The Repurpose Life's writeup best - short, sweet and easy to follow. These chairs will make a huge impact for a small cost given the simplicity to build and relatively short materials list. Let's get started!
Tools Needed:
Miter saw
Orbital sander
Drill with bits (it's easier if you have 2 drills, one to make the holes, the other to drive the screws)
Clamps
Materials Used:
Sandpaper (80 and 220 grit)
2 1/2" exterior wood screws
Paint/stain (I used Behr Exterior Enamel Little Black Dress in satin)
Mini paint roller & small paintbrush
Wood for two chairs:
(6) 2x4x8
(6) 2x6x8
(1) 2x2x8
Lumber cost as of July 2022: $5 per 2x4 ($30), $10 per 2x6 ($60), $4 per 2x2, $94 total for wood.
*OPTIONAL: Cushion Tools & Materials:
You can buy cushions (they're so expensive!) or make your own if you have a sewing machine. Promise it's super simple!
Sewing machine
4 yards of fabric (outdoor fabric if these are going outside! I used the same fabric and color as I did for the daybed cushions from Fabric Wholesale Direct)
Zipper (bulk zippers, from Amazon or anywhere else, are the way to go)
Thread
Scissors
Pins
6" foam (I ordered mine from The Home Depot and it was WAY less expensive)
Batting
Make your cuts.
Cut the 2x4s, 2x6s, and 2x2s as shown below:


Sand the pieces.
Starting with the 80 grit and an orbital sander, knock the rough edges off before going back with 220 grit to get a nice smooth finish. The last thing you want is a splinter on the back of your thighs!


Paint/Stain.
As always, I finish my pieces before assembling the project. I prefer having the control over the paint instead of having to turn the finished chair seven ways to Sunday trying to get all the nooks and crannies. It's up to you but it makes things easier in the long run!


Assemble.
It will make your life SO much easier if you have two drills - one to pre-drill the holes, another to drive the screws. I also recommend doing each step for each chair at the same time (as opposed to making one chair completely at a time).

Make the sides.
Attach three side slats (D) to two legs (A) using a 3/4" piece of scrap wood to keep the spacing consistent. The first slat should be flush with the end of the legs.

Add the armrest.
Attach the armrest (B) to the top of the side, using clamps to make sure the piece is flush.

Attach the sides to each other.
Build the back of the chair by taking six of the back and front slats (E) and securing them on either side. Use a long 3/4" piece of wood between the sides so they stand up and secure the back slats with screws, making sure they line up with the side slats. Take the last two back and front slats (E) and attach to the chair front, lined up with the bottom side slat.


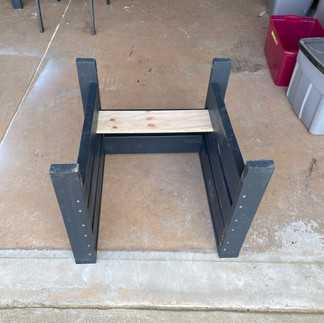


Add the 2x2 inside seat rails.
Take the inside rails (F) and attach them to the inside of the chair sides, 1 1/2" down from top of the lowest side slat (see photo) so the seat slats will be flush with the bottom rails.

Attach the seat..
Secure five of the back/seat slats (C) per chair to the inside rails, using a 3/4" piece of wood to keep the spacing consistent.

Add the back rest.
Take the final back/seat slat (C) and secure it to the back of the chair, flush with the back of the armrests.

And that's it for building! Simple, right?
Touch up the paint & move into place.
Wipe down your completed chairs to remove any sawdust and then touch up the paint where necessary and to cover the screws.


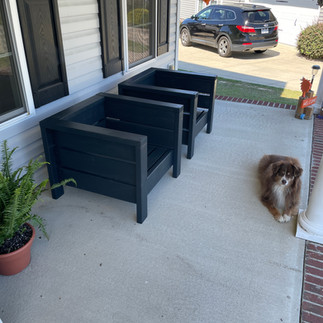
So easy to build! I love the richness of the color and how it coordinates with the shutters...but they still need cushions! The chair frames are quite low to accommodate the recommended 6" cushions. If you already have/bought cushions, plop those bad boys down and go enjoy your chairs. If you're going to make you own cushions, keep reading. Promise it's simple.

Make your cushions.
I made two 22" x 24" seat cushions and two 22" x 22" back pillows. I will not pretend to be a seamstress...I know the basics of using a sewing machine but I consult YouTube on a regular basis when I can't figure something out. Noelle O Designs' video walkthrough on how to sew a zippered box cushion was a LIFESAVER. Instead of me clumsily trying to explain it to you, I strongly recommend watching the video (probably 2 or 3 times).
First things first, cut your 6" foam to size (22" x 24") - my foam came as a 24" wide and 4 foot long piece that I cut with a serrated knife.


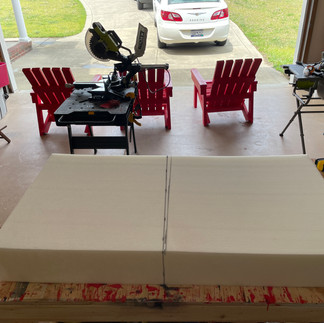


Grab your fabric, lay it out, and mark the pieces on the WRONG side of the fabric as shown below. You'll note that the fabric dimensions are slightly larger than the pillows/cushions - this is the seam allowance.
The cushions have a top and bottom, as well as a band that goes around the edges. The pillows only have a front and back.

Let's start with the cushions. The zipper will go around the front edge and a couple inches on either side to make it easy to get the foam inside once assembled. Cut the band to reflect those two pieces - the zipper section (approximately 30") and the longer side/back/side section (approximately 70"). Cut the zipper section in half length wise so you have two 4" wide pieces that are approximately 30" long. Install the zipper as shown (here's a great video from Niler Taylor who does a way better job explaining this than I ever would).


Zipper installed!

Now pin the zipper and the band together, sewing it to create one long continuous loop. The piece will be too big for the cushion - that's on purpose, the extra fabric will create a pocket on either end of the zipper. For now, pin the extra fabric "pocket" on either side so the loop fits snugly around the cushion.


Sew the bottom (or top, depending on how you look at it) to the band, paying close attention to the corners. Test it to make sure the cushion fits.


Add the top of the cushion paying close attention to the corners to make sure they all line up. I added a layer of batting around the foam to smooth the edges and fill the cover out.


Repeat the process for the other cushion.
The pillows are simple - lay the two sides of the fabric, right sides touching, together, pin, and sew the edges together. Leave a 3-4" hole so you can turn the pillow right side out and stuff with polyfil. Test the pillows every now and then to get your desired firmness then hand sew the opening closed.

Sit on your front porch and enjoy!
That's all there is to it! Enjoy your brand new, solid wood chairs and custom-made outdoor cushions. It's such a great feeling to know made these with your own two hands - and that you customize the design and finishes however you like. If you make your own I would LOVE to see them! Tag us at @reddesignedinteriors and #reddesignedtutorials.


Love this idea but don't have time right now? Save this pin for later!


Comments